DIY Water Level Sensor - Part 2
👉If you find any of this information useful, please be sure to subscribe to the Making Stuff channel. It doesn't cost you anything but a click! Click Here.
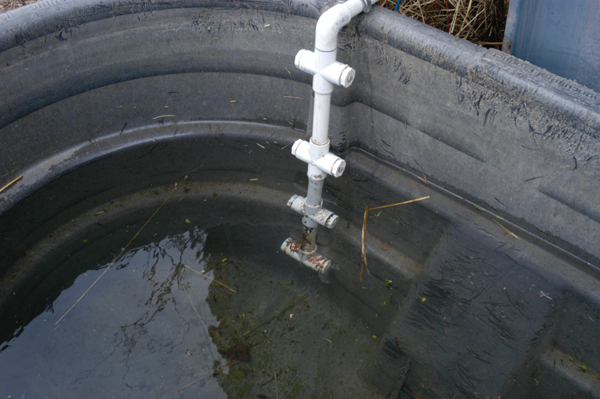
This is part 2 of the water sensor project. In part 1, I built the water sensor out of pvc plumbing parts found at the hardware store. In part 2, I show how to build and hook up the electronics so that the water level can be sent wireless to my computer.
It works by detecting when the water closes a circuit between the 2 screws which are hooked to the DIO pins on the transmitting Xbee. It will detect Full, 3/4, 1/2, 1/4 and empty. The results are sent using an API packet to the receiving Xbee. The Xbees used must be series 2 because series 1 will not work in API mode. This method is preferred because the Xbee can go into sleep mode, wake up and read the pins, transmit the data and go back into sleep mode without the use of a micro-controller or serial connection.
The receiving Xbee is hooked up to a Xbee Explorer with USB to a dedicated computer. There are a lot of options that can be used on the receiving end. For instance an Arduino or Rasberry Pi can be used to blink an LED, light up a bar graph, turn on a siren, send email or SMS message, move a needle with a servo or stepper motor. The possibilities are endless. Since this project is more about the water sensor I'm just going to use a simple method to demonstrate how it works. I wrote a simple program in C# that deciphers the data packets from the transmitting Xbee and plots the results on a graph.
I have my transmitting Xbee setup to transmit a data packet every 3 hours. Be sure to use a shorter value when you are building your water sensor until you have it dialed in and working. The transmitting Xbee must be an end device and the receiving Xbee must be the coordinator.
You can read the data sheet for the Xbees and see the different types of packets that the Xbees
will send when talking to each other. Here is a break down of the data packet that is transmitted by my water sensor.
7E 00 12 92 00 13 A2 00 40 9F 28 FF 88 96 41 01 00 1F 00 00 1F 14.
7E = Start Number
00 12 = Length of Packet
92 = IO Data Sample
00 13 A2 00 40 9F 28 FF = Address of transmitting Xbee
88 96 = Network Address (mesh network)
41 = Recieve options
01 = Number of sample sets (always 01)
00 1F = Pins with DIO enabled
00 = Analog bitmask
00 1F = Digital Samples
14 = Checksum
This is the configuration for the transmitting Xbee My I/O sampling and Sleep Mode settings are as follows:
Sleep Mode:
SM = 4
ST = 1388
SP = AF0
SN = 78
SO = 4
PO = 0
I/O Settings:
The D0 - D4 settings set the pins on the Xbee in Digital Input mode.
D0 = 3
D1 = 3
D2 = 3
D4 = 3
PR = 1fff
IR = 5DC
IC = 0
Please note that I originally tried this with WiFi Xbees and it worked fine for short sleep times. When I used large sleep times I discovered that the Xbee did not work, or sent garbage in the packets. I reported this to Digi and they confirmed that this was a bug with firmware version 2021. So be sure to use the latest firmware if you use the S6B Wifi Xbee modules.
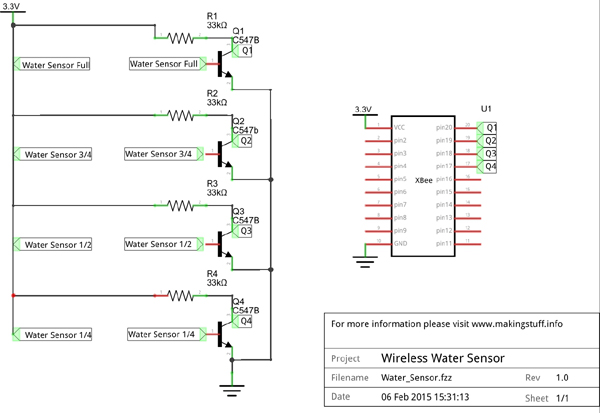
The schematic hook up is pretty straight forward. Be sure to use high gain transistors such as C547B. The water has a high resistance so a high gain transistor is a must.
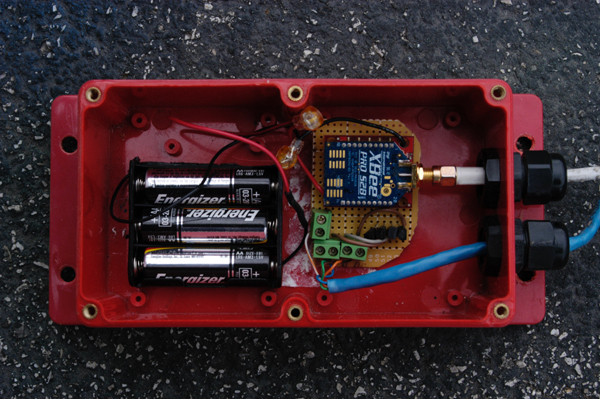
I'm using my transmitter outside. So I had to use an enclosure that is rated for outdoor use. Be sure to use one that has a gasket on it to keep the moisture out. I also had to use Heyco cable mounts because they are rated for outdoor use and make a water tight seal around the cables on the sensor wire and coax.
The distance from my barn to the house is over 700ft. I used a 2.4Ghz yagi to send the signal to the house. This works great and no outside antenna is required at the receiving end. I have tried this setup at much smaller distances, and no yagi or directional antenna was required.
This setup has worked well for me. I use it to monitor my horses water trough. By eliminating the need for a micro-controller on the transmitting end and placing the Xbee in sleep mode, I have been able to run this setup for 10 months now on the same 3 AA batteries with the Xbee set in high power mode. The batteries finally died on a unit that was in service, so I pulled it to replace the batteries which you can see in the video.
Be sure to check out part 1 for water sensor construction.Materials Used:
- 2 - Xbee Series 2 Modules
- 2 - Xbee break out boards
- 4 - C547B NPN Transistors
- 4 - 33k pull up resistors
- 1 - Project enclosure that is rated for outdoor use.
- 2 - Heyco cable mounts